Home NAS Deploment
Part I - Basic
Before All...
- What is a home NAS?
A typical home NAS is used for storing and sharing photos and files. As an extension to traditional NAS, the server config followed by this article would include more applications like offline downloader, media server, and printer server...
- Hardware requirement:
Any kind of popular architecture (x86, amd64, arm64) CPU, with high-speed network (ethernet, WIFI) and disk (USB3.*, SATA, NVME) interface. I'm not going to stop you from using an Android phone with a type-C to 4*USB (with PD backwards charging) as your cherished server.
Because technically I used such a server for more than 6 months, a Raspberry Pi 4. I had developed a habit to reboot it regularly every 2 days and bear the risk of losing all data.
So, be kind to yourself at this stage. Power and noise worth be considered as part of the budget, and also extension capability.
This is my current hardware, just for reference:
cpu:
                      Intel(R) Celeron(R) N5105 @ 2.00GHz, 2800 MHz
graphics card:
                      Intel JasperLake [UHD Graphics]
disk:
  /dev/nvme0n1         KIOXIA NVMe SSD  # root disk
  /dev/sda             TOSHIBA MG08ADA8 # data disk
memory:
                      Memory Size: 15 GB
About File System
I'm currently using Btrfs, which is a native Linux file system that has lots of modern features attracts me:
- CoW (copy on write): File won't be overwritten partially and then broken after a sudden power outage
- Compression: save your disk and money
- Subvolume and snapshot: save your data from accident such as you deleted your system (you won't, right?)
How to install Linux
I believe there are thousands of tutorials for beginners.
I don't trust any binary distro, I want to compile everything, where should I start?
Part II - Network
Note
2024.2.11 Update:
I switched to use cloudflare as my domain host, they provided some useful features:
- I can create a tunnel between cloudflare server and my server, which means when I enable cloudflare WARP on my client, the delay can very much reduce to 50ms.
- DDoS-protection, although I don't think there is any point to attract a personal Blog.
As far as I know, many ISPs (Internet Service Provider) block Port 80 and 443, which basically means you can not access directly to the web page. There are many workarounds: use another port instead and specify it when you access; use IPv6 instead but 80 and 443 may still be blocked; use a reverse proxy server but with higher delay.
I'm using frp as my reverse proxy software. A reverse proxy server means all your data will pass through a server held by others, so for those highly concerned about security, check out my previous post here
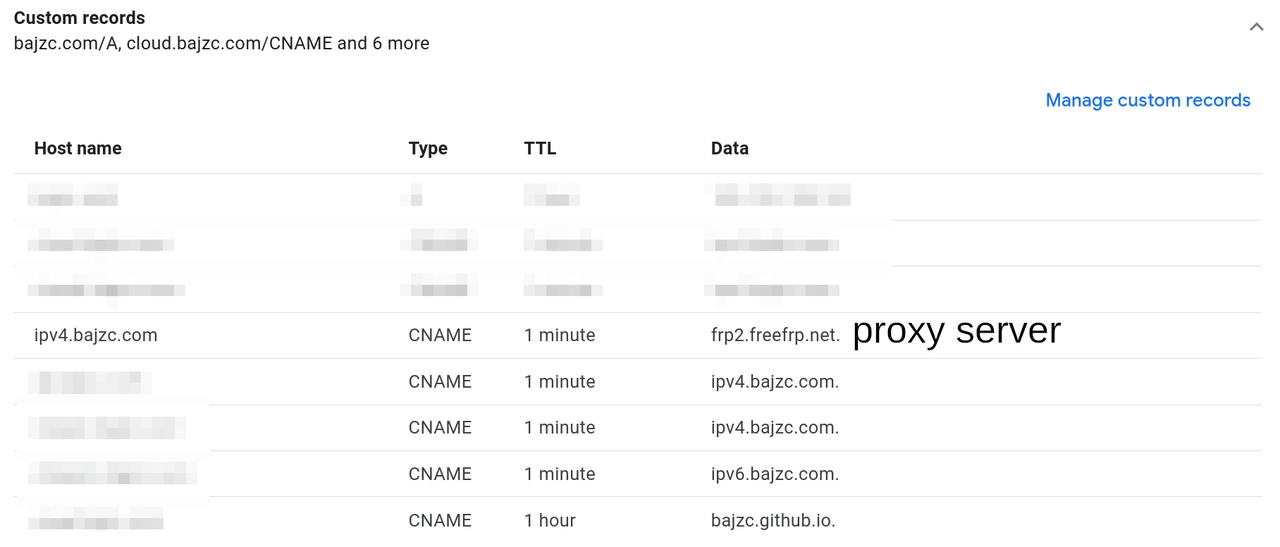
Frpc (client side) listens to a server at a specific port, your DNS record should point to that server. Once a request is made, the server will pass it to you according to the domain name, then frpc will forward it to the right application.
To be clear, frpc is still an application behind the firewall and inside docker. So if you are using IPv4 only, you can block all ports other than the one frpc is using. (only TCP)
Here is my frpc config file:
[common]
server_addr = frp2.freefrp.net  # proxy server you are using
server_port = 7000              # port given by the server holder, default: 7000
token = freefrp.net             # password, here the server is for public: https://freefrp.net/

[ipv4_bajzc_com_http]           # a unique entity
type = http                     # proxy type
local_ip = 10.5.0.3             # local server address
local_port = 80                 # local server port
custom_domains = ipv4.bajzc.com # URL you use to access this application

[ipv4_bajzc_com_https]
type = https
local_ip = 10.5.0.3
local_port = 443
custom_domains = ipv4.bajzc.com

......
A single frpc cannot stand, you need a frps (server) and correct DNS records. A frp server could be a VPS you buy from big cloud computing company, or from "kind" people share their resources. (Again, people concerned about security should check out my previous post here)
My DNS records as reference:

DNS-records
Part III - Docker
Suppose you overcome all difficulties and get your network and disk working now.
This article is mainly focusing on a Linux environment. Thanks to the portability of Docker, it could also apply to a Windows server, but comes at the expense of performance.
Docker applications structures
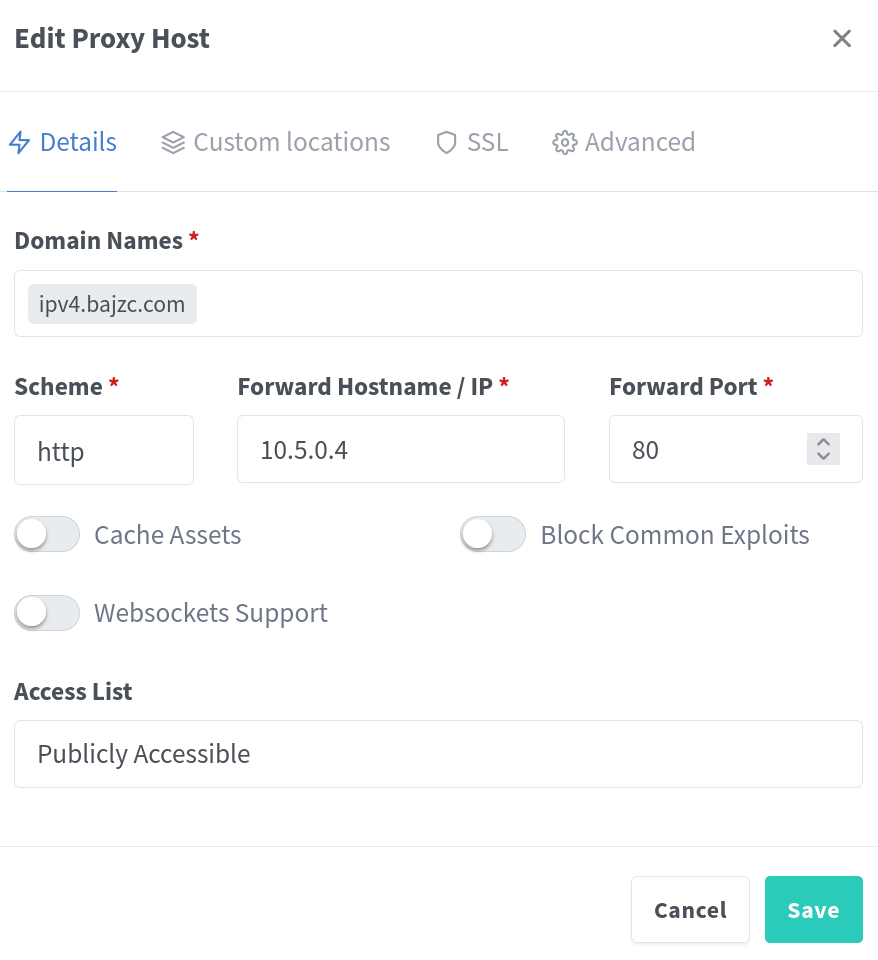
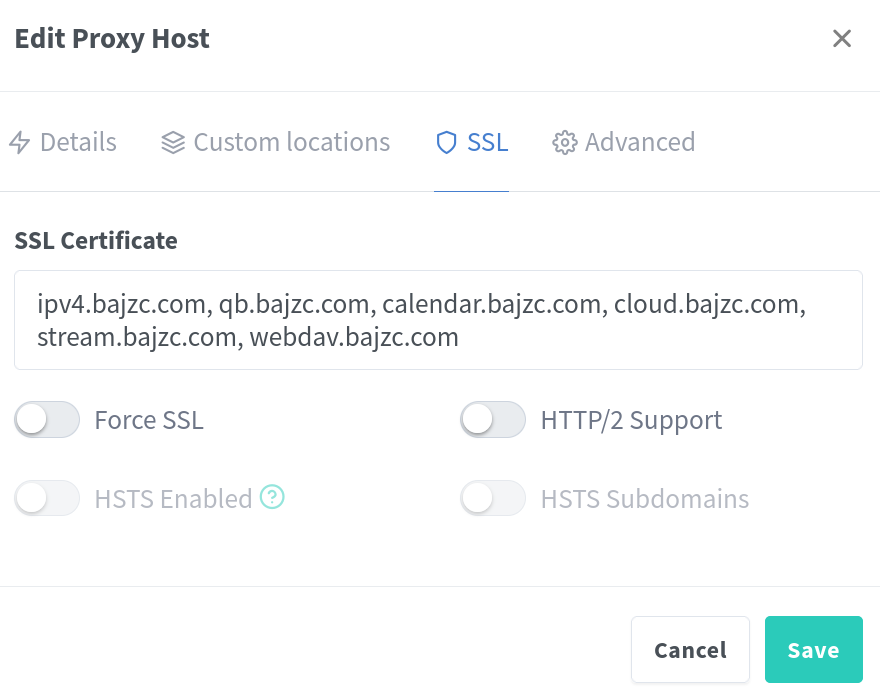
Here, address in yellow show the IP behind local subnet, which can only be access by local applications. The NPM (nginx proxy manager) is used to handle all access for all domains and warp them with HTTPS.
Docker Network:
networks:
  redisnet:                         # cache for Nextcloud
  NPM:                              # all apps should be under this subnet
    driver: bridge
    ipam:
      config:
        - subnet: 10.5.0.0/16
  qb-ipv6:                          # for IPv6 download
    enable_ipv6: true
    driver: bridge
    ipam:
      driver: default
      config:
        - subnet: 2001:3200:3200::/64
          gateway: 2001:3200:3200::1
Frpc
frp:
  restart: always                           # auto start after a reboot
  image: snowdreamtech/frpc:0.51.0
  container_name: frpc
  network_mode: "host"                      # use the host network
  volumes:
  # mount the config file dir into docker container (read only)
    - /all-docker-data/frp:/etc/frp:ro
Nginx Proxy manager
NPM:
  image: jc21/nginx-proxy-manager:latest
  container_name: nginx-proxy-manager
  restart: unless-stopped
  networks:
    NPM:
      ipv4_address: 10.5.0.3                        # address frpc should point to
  ports:
#      - "0.0.0.0:81:81"                            # Admin WebUI, disable after setup
    - "[::]:81:80"                                  # For IPv6 access (The default is block byb 3BB -_-)
    - "[::]:444:443"
  volumes:
    - /.../NPM/data:/data                           # WebUI data
    - /.../NPM/letsencrypt:/etc/letsencrypt         # https certificates
After you login to the WebUI, setup a proxy like this:

HTTPS:

Nextcloud
Nextcloud: It is a suite of client-server software for creating and using file hosting services.
db:                                         # database
    image: mariadb:10.6
    restart: always
    command: --transaction-isolation=READ-COMMITTED --log-bin=binlog --binlog-format=ROW
    volumes:
      - /.../nextcloud/db:/var/lib/mysql
    environment:
      - MYSQL_ROOT_PASSWORD=CHANGEME
      - MYSQL_PASSWORD=CHANGEME
      - MYSQL_DATABASE=nextcloud
      - MYSQL_USER=nextcloud

  redis:
    image: redis:alpine
    restart: always
    networks:
      - redisnet
    expose:
      - 6379

  nextcloud:
    image: nextcloud
    restart: always
    depends_on:
      - db
      - redis
    links:
      - db
    volumes:
      - /.../nextcloud/html:/var/www/html             # all your files
    environment:
      - REDIS_HOST=redis
      - MYSQL_PASSWORD=CHANGEME             # same password as in db
      - MYSQL_DATABASE=nextcloud
      - MYSQL_USER=nextcloud
      - MYSQL_HOST=db
      - PHP_MEMORY_LIMIT=1024M
      - PHP_UPLOAD_LIMIT=1024M
    networks:
      redisnet:
      default:
      NPM:
        ipv4_address: 10.5.0.5
Nextcloud requires some small tuning, check out the auto health-check in setting (click your account icon), and edit /.../nextcloud/html/config/config.php according to the document.
If Nextcloud is behind NPM, you need to add its address to trusted_domains and trusted_proxies, for me:
'trusted_domains' =>
array (
  0 => 'cloud.bajzc.com',
  1 => '10.5.0.5',
  2 => '10.5.0.3',
  3 => 'cloud6.bajzc.com',
),
'trusted_proxies' =>
array (
  0 => '10.5.0.0/16',
),
As NPM is using HTTP to communicate with Nextcloud:
'overwriteprotocol' => 'https',
'overwritecondaddr' => '^10\\.5\\.0\\.3$',   // NPM address here
'forwarded-for-headers' =>
array (
  0 => 'X-Forwarded-For',
  1 => 'HTTP_X_FORWARDED_FOR',
),
Docker Compose
All the config scripts I shared are part of the final docker-compose.yml file.
Install docker and docker-compose, edit your docker-compose.yml and run docker compose up -d under the same folder to start all the applications.
Part IV - Backup
Considering that you may store lots of personal data, such as photos and documents remotely on this server, you should carefully consider the backup issue.
Tools like snapper could be use to prevent from typing something wrong: rm -r / instead of rm -r ./. Unfortunately,these tools can not help you save data when a hard disk fault happened.
So, build a RAID array or LVM RAID would be nice, but this require you to have have two or more disks with same size, which are usually more expensive than your server...
Use cold backup, instead, allow you backup with disk with different size. For example, I use an 8TB HDD for the online storage and two 2TB disks for cold backup (offline).